Hexo NexT主题侧边栏展示相关文章
2023-01-30 更新: NexT主题已经支持相关文章功能 (使用hexo-related-posts ),更新到最新版本即可,可参考这里。
Hexo的NexT主题展示相关文章和热门文章使用 hexo-related-popular-posts 插件,但hexo-related-popular-posts 默认展示位置是在页面底部,而页面底部本身内容较多,多数人注意不到相关文章。因此,考虑将相关文章展示在侧边栏。
初始想法是将相关文章新建一个与目录块平齐的相关文章块,随着页面的滚动,目录吸附在页面顶部,相关文章块展示在目录块下方。无奈前端了解不多,试了下觉得难度系数略高。取了个折衷方案,将相关文章与目录显示在同一div中。
概览
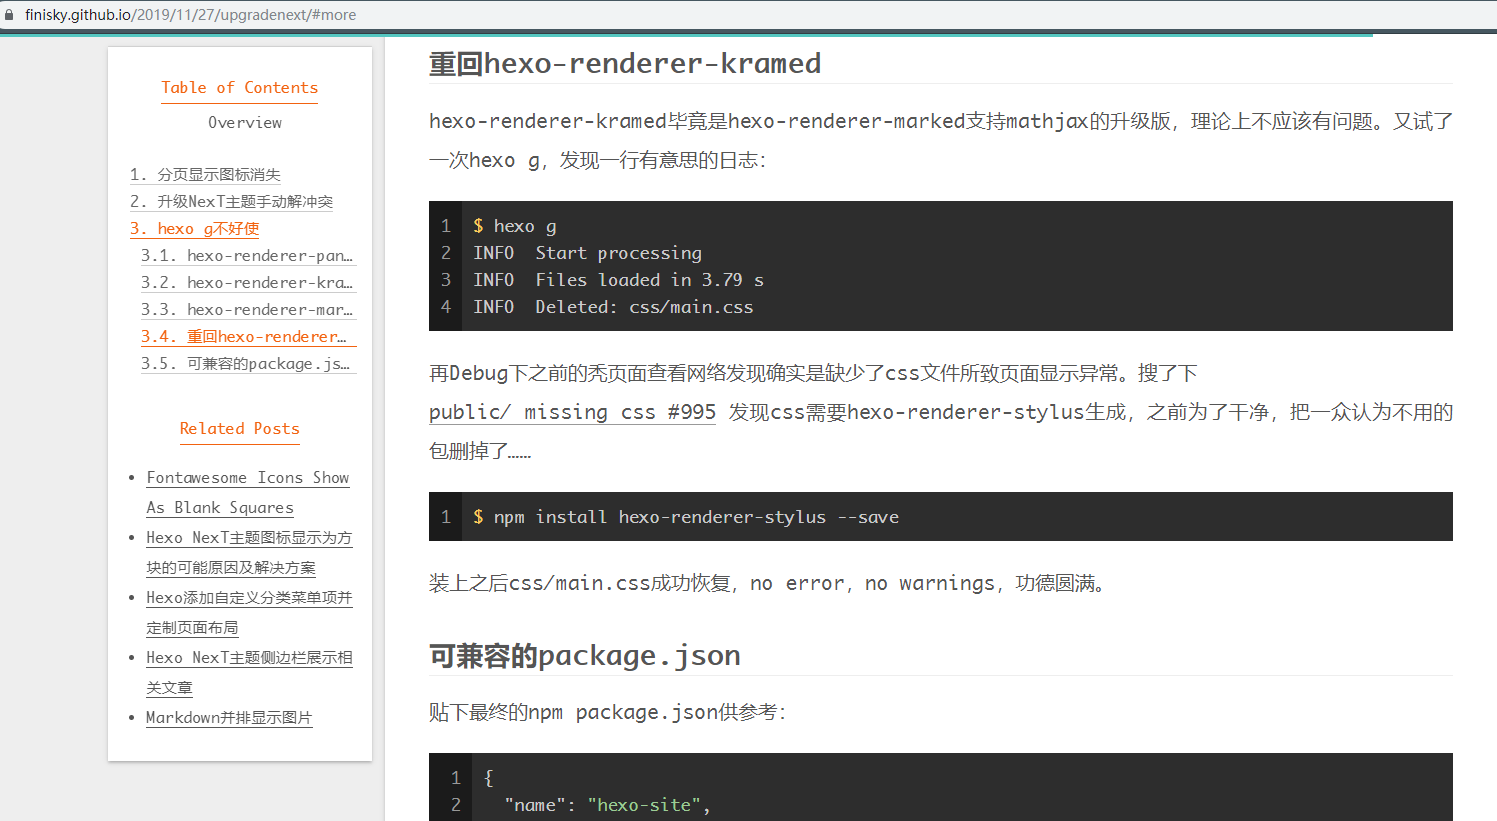
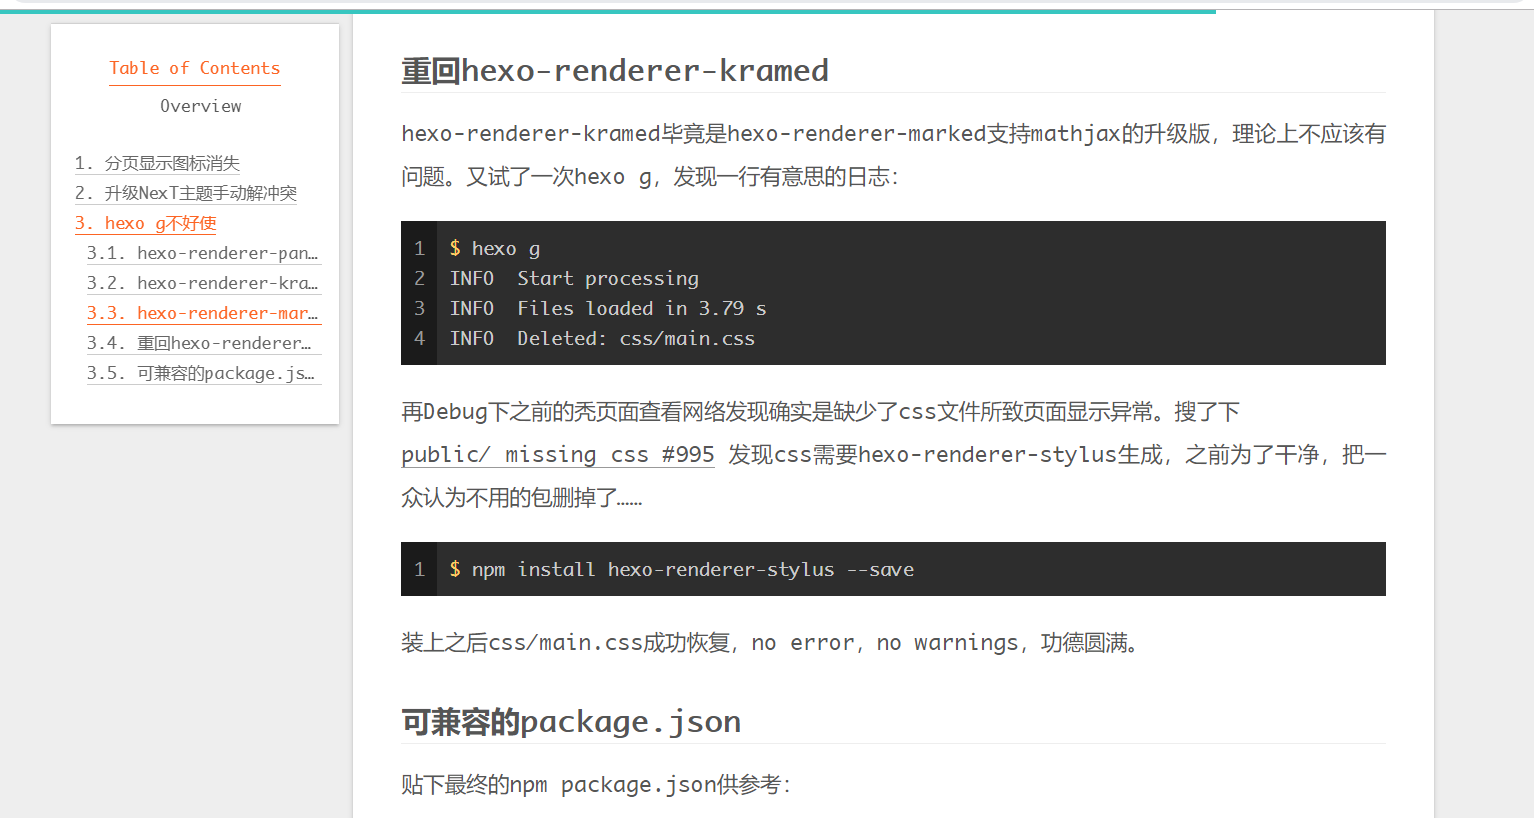
效果图
话不多说,先看效果。
侧边栏相关文章: 
原来的侧边栏: 
实现原则
- 修改尽量小,不对Hexo和NexT源码改动太多,添加新文件少改老文件,以免今后升级困难
- 复用hexo-related-popular-posts的相关文章处理逻辑
- 风格与主题保持一致
所有改动一览
修改改三个文件,新增两个文件:
~/finisky/themes/next/layout$ git status
On branch related
Changes not staged for commit:
  (use "git add <file>..." to update what will be committed)
  (use "git checkout -- <file>..." to discard changes in working directory)

        modified:   _macro/post.swig
        modified:   _macro/sidebar.swig
        modified:   ../source/css/_common/outline/sidebar/sidebar.styl

Untracked files:
  (use "git add <file>..." to include in what will be committed)

        _partials/post/post-related-sidebar.swig
        ../source/css/_common/outline/sidebar/sidebar-related.styl
获取相关文章数据
复用hexo-related-popular-posts计算出来的相关文章数据即可,源码在_partials/post/post-related.swig (隐去无关内容):
{%- set popular_posts = popular_posts_json(theme.related_posts.params, page) %}
{%- if popular_posts.json and popular_posts.json.length > 0 %}
  <div class="popular-posts-header">{{ theme.related_posts.title or __('post.related_posts') }}</div>
  <ul class="popular-posts">
  {%- for popular_post in popular_posts.json %}
...
      <div class="popular-posts-title"><a href="{{ popular_post.path }}" rel="bookmark">{{ popular_post.title }}</a></div>
      {%- if popular_post.excerpt and popular_post.excerpt != '' %}
        <div class="popular-posts-excerpt"><p>{{ popular_post.excerpt }}</p></div>
      {%- endif %}
    </li>
  {%- endfor %}
  </ul>
{%- endif %}显然,可以通过popular_posts这个变量访问到相关文章数据。
从侧边栏模板开始
看下前端代码,可以找到Table of Contents的模板在themes/next/layout/_macro/sidebar.swig中。该文件定义了整个侧边栏:
<aside class="sidebar">
  <div class="sidebar-inner">

    {%- set display_toc = page.toc.enable and display_toc %}
    {%- if display_toc %}
      {%- set toc = toc(page.content, { "class": "nav", list_number: page.toc.number, max_depth: page.toc.max_depth }) %}
      {%- set display_toc = toc.length > 1 and display_toc %}
    {%- endif %}

    <ul class="sidebar-nav motion-element">
      <li class="sidebar-nav-toc">
        {{ __('sidebar.toc') }}
      </li>
      <li class="sidebar-nav-overview">
        {{ __('sidebar.overview') }}
      </li>
    </ul>

    <!--noindex-->
    <div class="post-toc-wrap sidebar-panel">
      {%- if display_toc %}
        <div class="post-toc motion-element">{{ toc }}</div>
      {%- endif %}
    </div>
    <!--/noindex-->

    <div class="site-overview-wrap sidebar-panel">
      {{ partial('_partials/sidebar/site-overview.swig', {}, {cache: theme.cache.enable}) }}

      {{- next_inject('sidebar') }}
    </div>

    {%- if theme.back2top.enable and theme.back2top.sidebar %}
      <div class="back-to-top motion-element">
        <i class="fa fa-arrow-up"></i>
        <span>0%</span>
      </div>
    {%- endif %}

  </div>
</aside>
看起来实现并不复杂,copy下Table of Contents的div,只把内容修改成popular_posts即可。实验了下发现naive了,这样修改页面渲染会出问题,js报错,页面展示异常。想到应该是js修改了这些元素的内容,验证:
~/finisky/themes/next$ grep -r "post-toc" .
...
./source/js/utils.js:    const navItems = document.querySelectorAll('.post-toc li');
./source/js/utils.js:    var tocElement = document.querySelector('.post-toc-wrap');
./source/js/utils.js:      document.querySelectorAll('.post-toc .active').forEach(element => {
./source/js/utils.js:      while (!parent.matches('.post-toc')) {
./source/js/utils.js:    document.querySelector('.post-toc-wrap').style.maxHeight = sidebarWrapperHeight;
./source/js/utils.js:    var hasTOC = document.querySelector('.post-toc');
可见utils.js会获取class为"post-toc"的元素并操作,会引发上述错误。
我们仅需要复用TOC的css显示风格,不会用到js的这些动态操作。同时,我们不希望改变原有的逻辑。综上,比较好的实现方式是copy下TOC的css,在此基础上修改成相关文章的css style。
添加css: sidebar-related.styl
搜索找到toc的css文件在:themes/next/source/css/_common/outline/sidebar/sidebar-toc.styl文件中。添加新的sidebar-related.styl在此目录中:
.sidebar-related {
  font-size: $font-size-small;

  ol {
    list-style-type: disc;
    margin: 0;
    padding: 0 2px 5px 25px;
    text-align: left;
  }
}

.sidebar-related-title {
  margin-top: 20px;
  padding-left: 0;

  li {
    border-bottom-color: $sidebar-highlight;
    color: $sidebar-highlight;
    border-bottom: 1px solid;
    cursor: pointer;
    display: inline-block;
    font-size: $font-size-small;
  }
}
上面这个小css文件也颇费了些周折,把无用的style去掉,调整margin和padding和list-style-type。当然,也可改成自己喜欢的样式,不一定强求与原主题一致。
修改css: sidebar.styl
还要将新加的文件import到themes/next/source/css/_common/outline/sidebar/sidebar.styl中,添加一行,修改如下:
...
 @import 'sidebar-toc' if (hexo-config('toc.enable'));
+@import 'sidebar-related' if (hexo-config('toc.enable'));

 @import 'site-state' if (hexo-config('site_state'));
...
添加侧边栏列表: post-related-sidebar.swig
在themes/next/layout/_partials/post/文件夹中添加post-related-sidebar.swig:
{%- set popular_posts = popular_posts_json(theme.related_posts.params, page) %}
{%- if page.toc.enable and theme.related_posts.enable and (theme.related_posts.display_in_home or not is_index) and popular_posts.json and popular_posts.json.length > 0 %}
<div>
  <ul class="sidebar-related-title">
    <li>
      {{ theme.related_posts.title or __('post.related_posts') }}
    </li>
  </ul>

  <!--noindex-->
  <div class="sidebar-related">
    <ol>
      {%- for popular_post in popular_posts.json %}
      <li><a href="{{ popular_post.path }}" rel="bookmark"><span class="nav-text">{{ popular_post.title }}</span></a></li>
      {%- endfor %}
    </ol>
  </div>
  <!--/noindex-->
</div>
{%- endif %}
此处用到了前面定义的两个css style: sidebar-related-title和sidebar-related。同时用popular_posts变量输出了超链接和文章标题。
只有在启用了TOC和相关文章,且相关文章有内容的情况下才在侧边栏显示。
修改侧边栏: sidebar.swig
万事俱备,改一下侧边栏的文件:themes/next/layout/_macro/sidebar.swig,仅添加三行,把原始的TOC外面包一层div,再引用前文写好的post-related-sidebar.swig即可:
@@ -8,6 +8,7 @@
   <aside class="sidebar">
     <div class="sidebar-inner">

+      <div>
       {%- set display_toc = page.toc.enable and display_toc %}
       {%- if display_toc %}
         {%- set toc = toc(page.content, { "class": "nav", list_number: page.toc.number, max_depth: page.toc.max_depth }) %}
@@ -36,6 +37,9 @@

         {{- next_inject('sidebar') }}
       </div>
+      </div>
+      {{ partial('_partials/post/post-related-sidebar.swig') }}

       {%- if theme.back2top.enable and theme.back2top.sidebar %}
         <div class="back-to-top motion-element">
完整sidebar.swig如下:
{% macro render(display_toc) %}
  <div class="toggle sidebar-toggle">
    <span class="toggle-line toggle-line-first"></span>
    <span class="toggle-line toggle-line-middle"></span>
    <span class="toggle-line toggle-line-last"></span>
  </div>

  <aside class="sidebar">
    <div class="sidebar-inner">

      <div>
      {%- set display_toc = page.toc.enable and display_toc %}
      {%- if display_toc %}
        {%- set toc = toc(page.content, { "class": "nav", list_number: page.toc.number, max_depth: page.toc.max_depth }) %}
        {%- set display_toc = toc.length > 1 and display_toc %}
      {%- endif %}

      <ul class="sidebar-nav motion-element">
        <li class="sidebar-nav-toc">
          {{ __('sidebar.toc') }}
        </li>
        <li class="sidebar-nav-overview">
          {{ __('sidebar.overview') }}
        </li>
      </ul>

      <!--noindex-->
      <div class="post-toc-wrap sidebar-panel">
        {%- if display_toc %}
          <div class="post-toc motion-element">{{ toc }}</div>
        {%- endif %}
      </div>
      <!--/noindex-->

      <div class="site-overview-wrap sidebar-panel">
        {{ partial('_partials/sidebar/site-overview.swig', {}, {cache: theme.cache.enable}) }}

        {{- next_inject('sidebar') }}
      </div>
      </div>

      {{ partial('_partials/post/post-related-sidebar.swig') }}

      {%- if theme.back2top.enable and theme.back2top.sidebar %}
        <div class="back-to-top motion-element">
          <i class="fa fa-arrow-up"></i>
          <span>0%</span>
        </div>
      {%- endif %}

    </div>
  </aside>
  <div id="sidebar-dimmer"></div>
{% endmacro %}去掉文中相关文章:post.swig
将原始文末显示的相关文章去掉,删除三行themes/next/layout/_macro/post.swig:
     {### END POST BODY ###}
     {#####################}

-    {%- if theme.related_posts.enable and (theme.related_posts.display_in_home or not is_index) %}
-      {{ partial('_partials/post/post-related.swig') }}
-    {%- endif %}

     {%- if not is_index %}
{{- next_inject('postBodyEnd') }}小结
限于前端知识,本文实现方法可能还是不太“Hexo way”,不过算是达成了实现目标。如开头所言,更好的展示方式是创建一个与目录块平齐的相关文章块,作为future work吧。
有问题欢迎留言讨论~